

You already know I’m sort of obsessed with wood stumps so when my brother offered to show me how he was making wooden boxes out of small logs, I jumped at the chance. How fabulous to turn a little bit of wood into a beautiful giftbox or place to stash your emergency $20 bill? Vary the size a bit and you can use this in a lot of other ways too but lets just get down to the details.

DO NOT BE SCARED OFF by the length of the instructions – there are a lot of steps but its a very simple concept. Once you have it figured out, its not at all difficult. All you need is bit of log, a band saw, wood glue, clamps and a pencil.
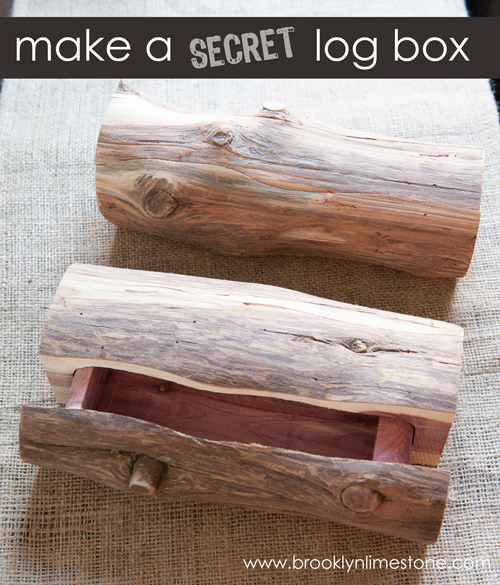
The gist of the project is that you cut slices off of 3 sides of the round log which gives you access to center. Then you cut out a piece for a drawer and glue it all back together again. Voila!


How to Make a Secret Log Box
Detailed instructions (click the image above for a larger view)
- Find a log, cut to desired finished size. (pic. 1-2)
- Slice off 3 slides of the log, leaving one rounded edge. Mark + set aside slices. (3-7)
- Draw a conversation box on log to mark drawer (8), cut (9-11)
- Cut out a slice to make back of drawer (12), set aside.
- Mark a rectangle on cut out to hollow out drawer (13), cut (14-15) + discard.
- Glue back of drawer to hollowed out drawer base, clamp, allow to dry (16-18)
- Glue sliced back to center of log, clamp, allow to dry (19-20)
- Once clamped pieces have dried, glue & clamp drawer to drawer front (21-23)
- Glue and clamp sliced base, allow to dry (24)
- Slide completed drawer into the open space and sand any rough spots if necessary.
You now have a secret hidey hole for any of your tiny treasures. Now go out and get some stumps.
[Via BrooklynLimestone.com]